Larasynth Tutorial
This tutorial will show you how to create a simple Larasynth project and to train a neural network that will adjust a MIDI parameter for you. Once you finish the tutorial, head over to the topic guide for a more complete discussion about using Larasynth.
Prerequisites
This tutorial assumes the following:
- You have installed Larasynth
- You have installed a software synthesizer with MIDI support (such as Helm) or you have a hardware synthesizer connected to your computer via MIDI
- You have a MIDI keyboard connected to your computer
For this tutorial project, Larasynth will control MIDI continuous controller number 1, which is usually mapped to the modulation wheel. The behavior will be very simple - when you play a note, the value of controller 1 will be adjusted from 0 up to 127 (its maximum value) and then back down to 0.
Project Organization
It is a good idea to put all your Larasynth projects somewhere where you can easily access them. Open up a terminal, create a directory for Larasynth, and navigate to that directory.
For example, here's how you would create and navigate to a directory called
larasynth within your Documents directory:
$ mkdir Documents/larasynth
$ cd Documents/larasynth
Creating a Project Directory
Every Larasynth project lives in a project directory. You can create a
project directory from the command line using the config action. Create
a project named tutorial by running the following command:
$ lara tutorial config
You should see the following output. You will need to provide confirmation for the directory to be created for you:
tutorial does not exist.
Create it now? (Y/n) y
Created tutorial
Wrote tutorial/larasynth.conf
Edit this file to finish setting up the configuration.
Note the command that was run: lara tutorial config. Every lara command
takes at least 2 arguments: the path to the project directory, and the action
to perform. In this case our project directory is named tutorial and the
action we want to perform is config, which creates the project directory and
a configuration file.
Try listing the contents of the tutorial directory:
$ ls tutorial
larasynth.conf
So far the project directory only contains one item, larasynth.conf. You will
need to edit this file to configure your project.
Editing larasynth.conf
Now you need to edit larasynth.conf. Any plain text editor will work. Open up
larasynth.conf in your editor of choice.
A larasynth.conf file contains values for many parameters which affect
Larasynth's behavior. The parameters are organized into several sections.
The [midi] Section
The first section you want to edit is the the [midi] section, which is the
first section in the file. You should see this:
[midi]
# Which controllers to control
controllers = 1, 2

# Default controller values are also specified as a comma separated list. Here
# controller 1 defaults to 0 and controller 2 defaults to 127
controller_defaults =
   1, 0,
   2, 127
For this tutorial you only want to control controller number 1 (which is usually mapped to the modulation wheel). Edit these two parameters so that Larasynth will only control parameter 1 and it has a default value of 0. I removed the comments so that the text is more compact:
[midi]
controllers = 1
controller_defaults =
   1, 0
You can leave the MIDI port parameters commented out for now.
The [representation] Section
The next section to edit is the [representation] section. These parameters
let you set how the controller values are represented, how ofen Larasynth
should update the controller values, and what features from the state of the
keyboard should be passed to Larasynth.
Output Counts
The first parameter is controller_output_counts. This controls the resolution
of the continuous controller values. For this tutorial, set the output count
to 8. This means that the controller will be allowed to vary from 0 to 127, but
at any given time it will only be able to have one of the following 8 values:
0, 18, 36, 54, 73, 91, 109, or 127.
Update Rate
The update_rate parameter specifies how often the parameter values will be
re-calculated and potentially updated. By default this value is 75, which means
75 updates per second or approximately one update every 13 milliseconds. This
is more frequent than we need for this example, so change the value of
update_rate to 20.
Input Features
Here is the default input_features list:
input_features =
     "some note on",     # any note is currently playing
     "note struck",      # a note has just been struck
     "note released",    # a note has just been released
     "velocity",         # the velocity of the note that was just struck
     "interval"          # the interval between the last two struck notes
Each of these features provides additional information about the current state
of the keyboard to the neural network. For this example project, all the
network needs to care about is whether or not a note is currently being played,
so the only input feature we need is "some note on". Remove the other
features from the list, and be sure to remove the trailing comma after "some
note on".
Now you should have a [representation] section that looks like this (with
comments removed):
[representation]
controller_output_counts =
1, 8
update_rate = 20
input_features =
"some
note on"
For future projects you may want to adjust the parameters in the [training]
section, but for this tutorial project the default values should work fine.
Importing a Training Example
Now you need to provide a training example that Larasynth can learn from. This can be in the form of a MIDI file, or you can record MIDI events into Larasynth through a MIDI port. For this tutorial, a MIDI file is provided for you.
This MIDI file is extremely simple. It consists of a single note, and control change events which change the value of continuous controller 1 over the duration of the note. This is what it looks like in the open source MIDI editor Aria Maestosa:
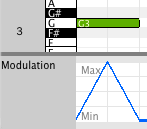
Download the MIDI file here. You may save it to wherever you like, but you will need to know where it is so that you may specify its location to Larasynth.
Now you can import the MIDI file as a training example using Larasynth's
import action. Assuming you saved the MIDI file into your Downloads folder,
run the following command:
$ lara tutorial import ~/Downloads/larasynth_tutorial.mid
If all goes well, the output should look something like this:
Read events from 2 tracks in /home/username/Downloads/larasynth_tutorial.mid:
  1 notes
  252 controller events
Wrote 254 events to tutorial/training_examples/example-2017-05-26-17:23:11.611898.seq
The note and controller events are in 2 different tracks in the MIDI file. Larasynth will always merge all of the tracks of a MIDI file into a single training example.
Training
Now that you have imported the MIDI file as a training example you are ready to train!
Run the following command:
$ lara tutorial train
You should see output that looks something like this:
Training LSTM network.

Network configuration:

Block counts: 43
Learning rate: 0.05
Momentum:      0.8

Training configuration:

Max epochs:    3000
MSE threshold: 0
Epochs before validating: 100
Backpropagate if correct: 0
Reset probability: 0.5
Consecutive failures for reset: 5
Squared error failure tolerance: 8

Representation configuration:

Controller output counts:
  1: 8
Update rate: 20
Input features:
  some note on

Validating after epoch 1
MSE: 1828.29
New best MSE
Validating after epoch 2
MSE: 3296.42
Validating after epoch 88
MSE: 7168.7
Validating after epoch 100
MSE: 2663.65
Validating after epoch 160
MSE: 2610.97
Validating after epoch 185
MSE: 1750.25
New best MSE
Validating after epoch 195
MSE: 1514.7
New best MSE
Validating after epoch 200
MSE: 1456.44
New best MSE
Validating after epoch 218
MSE: 1246.76
New best MSE
Validating after epoch 244
MSE: 416.796
New best MSE
Validating after epoch 245
MSE: 1159.49
Validating after epoch 248
MSE: 1029.46
Validating after epoch 263
MSE: 441.089
Validating after epoch 293
MSE: 0
New best MSE
MSE threshold hit after 293 epochs

Writing results to tutorial/training_results/results-2017-05-26-17:31:43.194222.json
Since the neural network is randomly intitialized, the number of training epochs will vary from run to run.
The network is trying to minimize the mean squared error (MSE) of its predictions during each training epoch. Achieving an MSE of 0 means that the network was able to to learn to perfectly reproduce the control change events from the training example.
Since this is such a straightforward example, you should be able to hit an MSE of 0 each time you train with this example. When you create more complicated examples it may be difficult or impossible for the network to learn to reproduce the output perfectly. In those cases training will stop after a certain number of training epochs or when the MSE is below a certain threshold. You can configure these values in the project configuration file.
Performing
Now that you have a trained network, you can use Larasynth to perform!
Start your software synthesizer (or connect your hardware synthesizer to your computer) and connect your MIDI keyboard. Make sure that the keyboard is not currently set up to send events to the synthesizer. Once Larasynth is running in performance mode, MIDI events from the keyboard will be sent to Larasynth, and Larasynth will forward them on to the synthesizer.
Run the following command:
$ lara tutorial perform -v
The -v option indicates that you would like verbose output, which means
a message will be printed each time a MIDI event is sent to the
synthesizer. This is nice for making sure everything is working correctly but
it can add latency to the system.
You will first be prompted to select a trained network from the training results:
Pick from the following training results:
  1: MSE: 0 - results-2017-05-26-17:31:43.194222.json
  q: quit
Enter your choice: 1
Next you will be prompted to select a port for output. If your synthesizer opens a port for devices to connect to, it should show up in this list. If not, you will need to open a port for the synthesizer to connect to:
Select a MIDI port to send to:
  0: Open a port for other devices to connect to
  q: quit
Enter your choice [q]: 0

Opened port "larasynth output" for other devices to connect to
Now select a port for input. Here we we are using MidiKeys, a software MIDI keyboard:
Select a MIDI port port to receive from:
  1: MidiKeys
  2: larasynth output
  0: Open a port for other devices to connect to
  q: quit
Enter your choice [q]: 1

Receiving from port "MidiKeys"

Performing with an update interval of 50000 microseconds
Larasynth is now running in performance mode. If you opened ports for other devices to connect to, connect those devices now. You should now be able to play notes and Larasynth will adjust controller 1:
note 60 on
set controller 1 to 18
set controller 1 to 36
set controller 1 to 54
set controller 1 to 73
set controller 1 to 91
set controller 1 to 109
set controller 1 to 127
set controller 1 to 109
set controller 1 to 91
set controller 1 to 73
set controller 1 to 54
set controller 1 to 36
set controller 1 to 18
set controller 1 to 0
note 60 off
Note that for this example, controller 1 will be reset to 0 when a note is released, but if a note is held continually then controller 1 will continue to oscillate up and down.
Beyond This Tutorial
From here the possibilities are endless! Please see the user guide for a more detailed guide to creating good training examples and using Larasynth's features.